
How to Draw a Cat Step by Step: 5 Easy Guides for Kids and Beginners
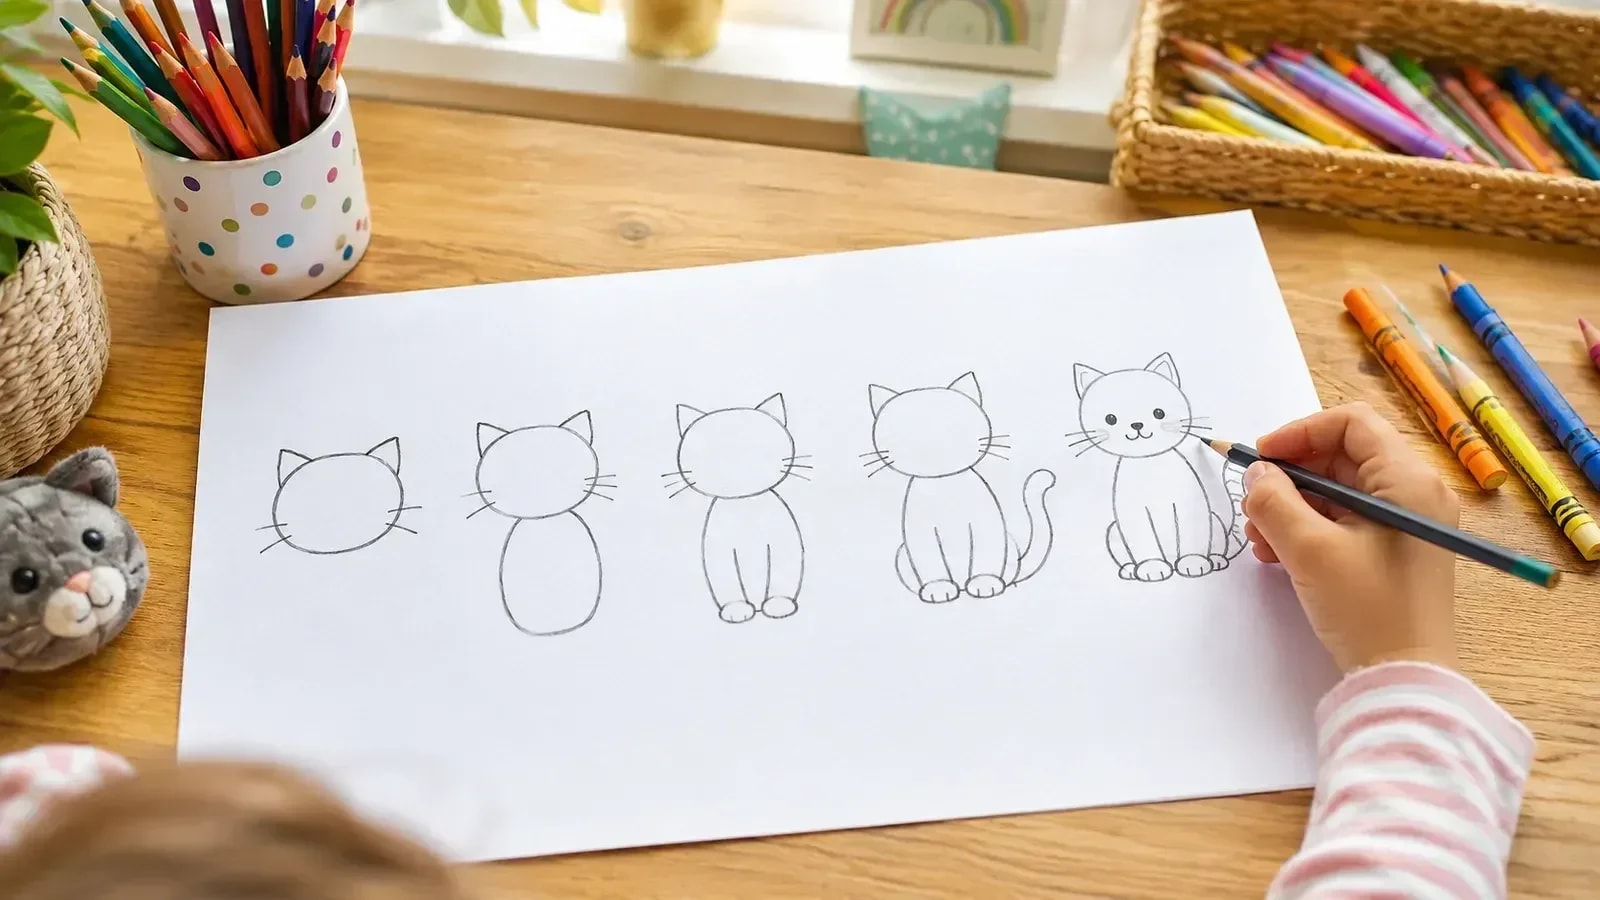
If you want to learn how to draw a cat step by step, start with simple shapes rather than fur, whiskers, or tiny details. A cat can be built from circles, ovals, triangles, and a few curved lines. Once the proportions look right, you can add the face, paws, tail, markings, and texture.

Contents14
- What Is Needed to Draw a Cat
- How to Draw a Cat Step by Step: the Basic Principle
- How to Draw a Cat Face in 6 Steps
- How to Draw a Sitting Cat
- How to Draw a Cat From Circles and Ovals
- How to Draw a Cat Standing on All Fours
- How to Draw a Cat in Profile
- How to Draw a Cat With a Pencil More Realistically
- How to Draw a Cat's Eyes Correctly
- How to Draw a Cat's Nose and Face
- How to Draw a Fluffy Cat
- How to Draw a Kitten, Not an Adult Cat
- How to Draw a Cat for a Child 4–6 Years Old
- How to Draw a Cat for a Child 7–10 Years Old
If you want to learn how to draw a cat step by step, start with simple shapes rather than fur, whiskers, or tiny details. A cat can be built from circles, ovals, triangles, and a few curved lines. Once the proportions look right, you can add the face, paws, tail, markings, and texture.
After drawing your cat, turn it into a story character or try a different paper activity. Our rainy-day printable activities for kids include colouring, puzzles and ideas for a small art gallery.
This guide gives five easy drawing schemes first, then shows how to improve eyes, muzzle, fluff, coloring, and proportions. The instructions work for children and complete beginners using an ordinary pencil and paper.
What Is Needed to Draw a Cat
You only need a few basic materials:
plain drawing paper;
an HB or No. 2 pencil for light construction lines;
a softer pencil such as 2B for darker outlines, optional;
an eraser;
colored pencils, markers, or crayons if you want to add color.
A ruler is unnecessary. Slightly uneven handmade lines often make a simple cat drawing look more lively.
How to Draw a Cat Step by Step: the Basic Principle
Start with the largest shapes: head and body.
Add the direction of the spine and tail.
Place the legs as simple lines or narrow ovals.
Add ears, eyes, nose, and muzzle only after the proportions work.
Erase construction lines lightly.
Darken the final outline and add fur or markings last.
Beginners often make drawing harder by starting with an eye or paw and trying to build the whole animal around it. Large shapes first are easier to correct.
How to Draw a Cat Face in 6 Steps
This is Guide 1 of 5 and the easiest place to start.
Draw a soft circle for the head.
Add two triangles on top for the ears.
Draw a faint vertical center line and a horizontal eye line.
Place two almond-shaped eyes on the horizontal guide.
Add a small upside-down triangle or rounded shape for the nose and two short curves for the mouth.
Add whiskers, inner ears, pupils, and any fur markings, then erase the guides.
Keep the eyes lower than you may expect. If they sit too high, the face can look more like a cartoon fox than a cat.
How to Draw a Sitting Cat
This is Guide 2 of 5.
Draw a circle for the head.
Under it, draw a large vertical oval for the chest and body.
Add two long front legs descending from the chest.
Draw two curved haunches on the sides of the lower body.
Add small front paws and a curved tail wrapping around one side.
Add the ears and face, then soften the body outline with small fur strokes.
A sitting cat becomes recognizable mainly through the straight front legs and larger rounded back legs. Do not make all four legs identical.
How to Draw a Cat From Circles and Ovals
This is Guide 3 of 5 and works especially well for younger children.
Draw one small circle for the head.
Draw one larger oval below and slightly behind it for the body.
Connect the shapes with two short neck lines.
Add four narrow oval legs or simple curved shapes.
Draw a long curved tail and two triangular ears.
Add a simple face and erase the overlapping construction lines.
The method teaches children to see an animal as a combination of shapes. It also makes it easy to exaggerate the cat into a cute cartoon style.
How to Draw a Cat Standing on All Fours
This is Guide 4 of 5.
Draw a horizontal oval for the ribcage.
Add a smaller circle for the head at one end.
Sketch a light line from head to tail to establish the back.
Place four leg lines under the body, remembering that the far legs may be partly hidden.
Add simple joint bends, then thicken the legs around those guides.
Draw the tail, ears, face, and paws.
Erase the construction lines and refine the outline.
A standing pose looks better if the legs are not four identical vertical sticks. Shift one front paw or one back paw slightly forward to suggest balance and movement.
How to Draw a Cat in Profile
This is Guide 5 of 5.
Draw a small oval for the skull.
Add a short wedge or curved bump for the muzzle.
Place one visible triangular ear and part of the far ear.
Draw a larger oval for the body and connect it to the head with the neck.
Add the legs, chest, belly, and tail as simple curves.
Draw one visible eye from the side, plus nose, mouth, and whiskers.
Refine the silhouette and erase guides.
In profile, do not draw the eye as a full front-facing almond. It should look narrower because you are seeing it from the side.
How to Draw a Cat With a Pencil More Realistically
After you can build the simple silhouette, realism comes from proportion, value, and edge control rather than from drawing thousands of hairs.
Use a photo reference with clear light.
Block in the head, ribcage, pelvis, and leg direction lightly.
Compare widths and angles before adding details.
Shade the biggest dark and light areas first.
Add only selected fur strokes around edges and direction changes.
Keep some edges soft so the drawing does not look cut out.
Squinting at the reference can help you see the large light-dark pattern instead of getting distracted by individual hairs.
How to Draw a Cat's Eyes Correctly
Draw the two eye shapes on the same guide line.
Check the distance between them before adding pupils.
Add the iris and vertical or rounded pupil depending on the expression and lighting.
Leave a small highlight rather than coloring the whole eye dark.
Darken the upper eyelid slightly more than the lower one.
Shade around the eye socket so the eye feels set into the face.
For a simple child-friendly drawing, large round eyes are fine. For realism, copy the actual reference rather than applying one fixed "cat eye" formula.
How to Draw a Cat's Nose and Face
Place the nose on the vertical center line.
Draw a small rounded triangle rather than a huge sharp triangle.
Add a short line down from the nose.
Draw two gentle curves for the muzzle.
Add the mouth only as much as needed; a heavy black line can look unnatural.
Place whisker dots and whiskers on the muzzle pads.
Whiskers should begin near the muzzle, not from the cheeks or neck. Use quick confident strokes instead of repeatedly tracing each line.
How to Draw a Fluffy Cat
Build the body with smooth shapes first.
Replace selected parts of the outline with short tapered fur strokes.
Follow the direction of fur growth: outward on cheeks, downward on chest, and along the body.
Make the silhouette slightly larger around the neck, belly, and tail.
Use clusters of strokes rather than outlining every hair.
Keep the face readable so fluff does not hide all structure.
Fluff is a surface effect. If the underlying body is wrong, extra fur will not fix the proportions.
How to Draw a Kitten, Not an Adult Cat
Make the head larger in relation to the body.
Keep the muzzle shorter and rounder.
Make the legs shorter and paws slightly oversized.
Place the eyes relatively large and low on the head.
Use a compact body and playful tail curve.
Avoid making the neck too long or the chest too broad.
These are stylization cues, not rigid biological measurements. A real kitten still varies by breed and age.
How to Draw a Cat for a Child 4–6 Years Old
Use one circle for the head and one oval for the body.
Add two triangle ears.
Draw simple line legs with rounded paws.
Add two dots or circles for eyes and a tiny nose.
Draw a large curved tail.
Let the child color freely rather than correcting every proportion.
At this age, the goal is recognition and enjoyment, not anatomical accuracy. Praise what the child noticed: tail shape, stripes, ears, or expression.
How to Draw a Cat for a Child 7–10 Years Old
Begin with construction shapes but keep them light.
Add simple joints to the legs instead of straight sticks.
Use a center line to place facial features.
Try a sitting or standing pose rather than only a face.
Add markings from a real cat or reference photo.
Experiment with simple shading under the chin, belly, and paws.
Children in this age range often enjoy seeing clear progress, so keeping the first sketch and comparing it with a later one can be more useful than demanding a perfect result immediately.
5 Simple Options for Drawing a Cat: What to Choose for a Child
Choose exactly one of these five core guides depending on age and confidence:
Cat face — fastest and best for a first attempt.
Sitting cat — easy full-body pose with a clear silhouette.
Circles-and-ovals cat — best for younger children learning basic shapes.
Standing cat — good for learning legs and body proportions.
Profile cat — useful for understanding side-view head and body shapes.
Do not make a child complete all five in one sitting. One successful drawing is more motivating than five rushed ones.
What Mistakes Prevent You From Drawing a Cat
Common problems include drawing details before the body, pressing too hard with the first lines, making all legs identical, placing the eyes too high, drawing whiskers from random parts of the face, and trying to hide proportion mistakes under fur.
Another frequent mistake is comparing a beginner's drawing with finished professional art. Compare it with the previous attempt instead. Improvement becomes much easier to see.
How to Make a Cat Drawing More Interesting
Give the cat a clear pose: stretching, sleeping, sitting, or looking upward.
Add a simple environment such as a windowsill, cushion, box, or patch of grass.
Use a distinctive tail curve to show mood.
Add real coat markings from a reference cat.
Change the viewpoint slightly instead of always drawing straight from the front.
Use one small prop such as a toy mouse or ball of yarn without overcrowding the picture.
A simple story in the picture often makes it more memorable than extra technical detail.
How to Color a Picture of a Cat
Choose the base coat color first.
Add darker markings after the base layer.
Leave small lighter areas on the eyes and nose for highlights.
Shade under the chin, belly, and paws with a slightly darker version of the local color.
Layer colored pencils lightly instead of pressing hard immediately.
Add the background last so you can judge how much contrast the cat needs.
Real cats are not the only option. Children can use blue, purple, green, or patterned fur if the goal is creative drawing rather than realism.
Does the Child Need to Copy the Step-by-Step Diagram Exactly?
No. A diagram is scaffolding, not a test. If the ears are larger, the tail curls the other way, or the markings are invented, the drawing can still succeed.
For younger children especially, repeated correction can make drawing feel like a worksheet. Show one useful idea at a time—such as "make the body from an oval"—and allow the rest to stay personal.
How to Learn to Draw Cats Better
Draw from real photos as well as tutorials.
Make quick two-minute sketches to practice pose and proportion.
Redraw the same cat a week later instead of constantly choosing new subjects.
Study one feature at a time: eyes, paws, ears, or tails.
Keep old drawings so progress is visible.
Use references openly; beginners do not need to invent anatomy from memory.
Ten short studies usually teach more than one drawing that is repeatedly erased for an hour.
A simple practice routine can make the five guides much easier. Draw the same pose three times on one sheet, spending only a few minutes on each version. On the first, focus on the big shapes. On the second, correct the proportions you disliked. On the third, add the face and fur. Repetition teaches more than erasing one drawing until the paper is damaged.
For children, tracing should be used carefully. Tracing a simple shape once can help explain how a curve works, but the next attempt should be freehand so the child learns to observe rather than only follow a line. Another useful exercise is to turn the reference upside down or cover part of it and draw only the visible shapes. This shifts attention away from the idea of "a cat" and toward the actual angles and proportions.
If a finished drawing still looks unlike a cat, check three things before adding detail: the head-to-body ratio, the placement of the legs, and the shape of the ears. Those large landmarks usually matter more than perfect eyes or whiskers.
Beginners improve faster when they repeat the same simple construction several times instead of trying to make one perfect drawing. Draw three or four cats with the same basic head-and-body shapes, then change only one feature at a time: ear angle, tail curve, eye shape, or body pose. This makes proportion easier to understand because you can see exactly what each change does.
For children, it also helps to separate drawing from correcting. Use light pencil lines for the first shapes, choose the best contour afterward, and erase construction marks only at the end. If a paw, ear, or eye is uneven, keep going rather than restarting the whole page. A slightly imperfect cat with a clear pose and expression usually looks more convincing than a heavily corrected drawing that has lost its energy.
FAQ
Step 1. Draw the head?
Yes. For the face guide, begin with a light circle. For a full-body cat, you can draw head and body shapes together before adding any details.
Step 2. Add ears?
Place two triangular ears on the top sides of the head. Change their angle to make the cat look alert, relaxed, or curious.
Step 3. Draw the eyes?
Use a horizontal guide so both eyes sit at a similar height. Keep them simple for a cartoon drawing and add more structure only if you want realism.
Step 4. Draw the nose and mouth?
Add a small nose on the center line, a short line beneath it, and two soft curves for the muzzle. Avoid making the mouth too heavy.
Step 5. Add a mustache?
Add whisker dots and then several quick whisker strokes from each muzzle pad. Do not draw the whiskers from the entire cheek.
Step 6. Color the cat?
Yes. Erase unwanted construction lines first, then add base color, markings, shadows, and small highlights.
How to draw a cat easily?
Use circles and ovals, keep the first lines light, and add details only after the silhouette reads clearly as a cat.
How to draw a cat for a child?
Choose the circles-and-ovals method for a young child or the sitting-cat method for an older child. Keep the session short and let the child change details freely.
How to draw a cat step by step with a pencil?
Block in the head and body, place the legs and tail, add facial guides, refine the outline, erase construction lines, and finish with light shading.
How to draw a cat's face?
Start with a circle, add ears, place the eyes on a guide line, then add a small nose, muzzle, whiskers, and markings.
Best of the week — in your inbox
No spam. Only top Gosta stories. Unsubscribe in one click.
Comments